
Membership hub (Advanced Thank You Page), how to create a
About this template
This template has various use cases.
To goal of this page is to centralize all the important matters for a specific launch or challenge or summit or membership.
A single page that your customers can bookmark as the stable point to refer back to.
It is the template I used for my Dot Com Truths Virtual Summit Hub, my tech support membership hub, and also my Landing Page Challenge hub.
This template is excellent for a thank you page and was originally inspired by seeing Amy Porterfield's thank you page, as well as Jeff Walker's Product Launch Formula concierge page.
Video Tutorial
Template images
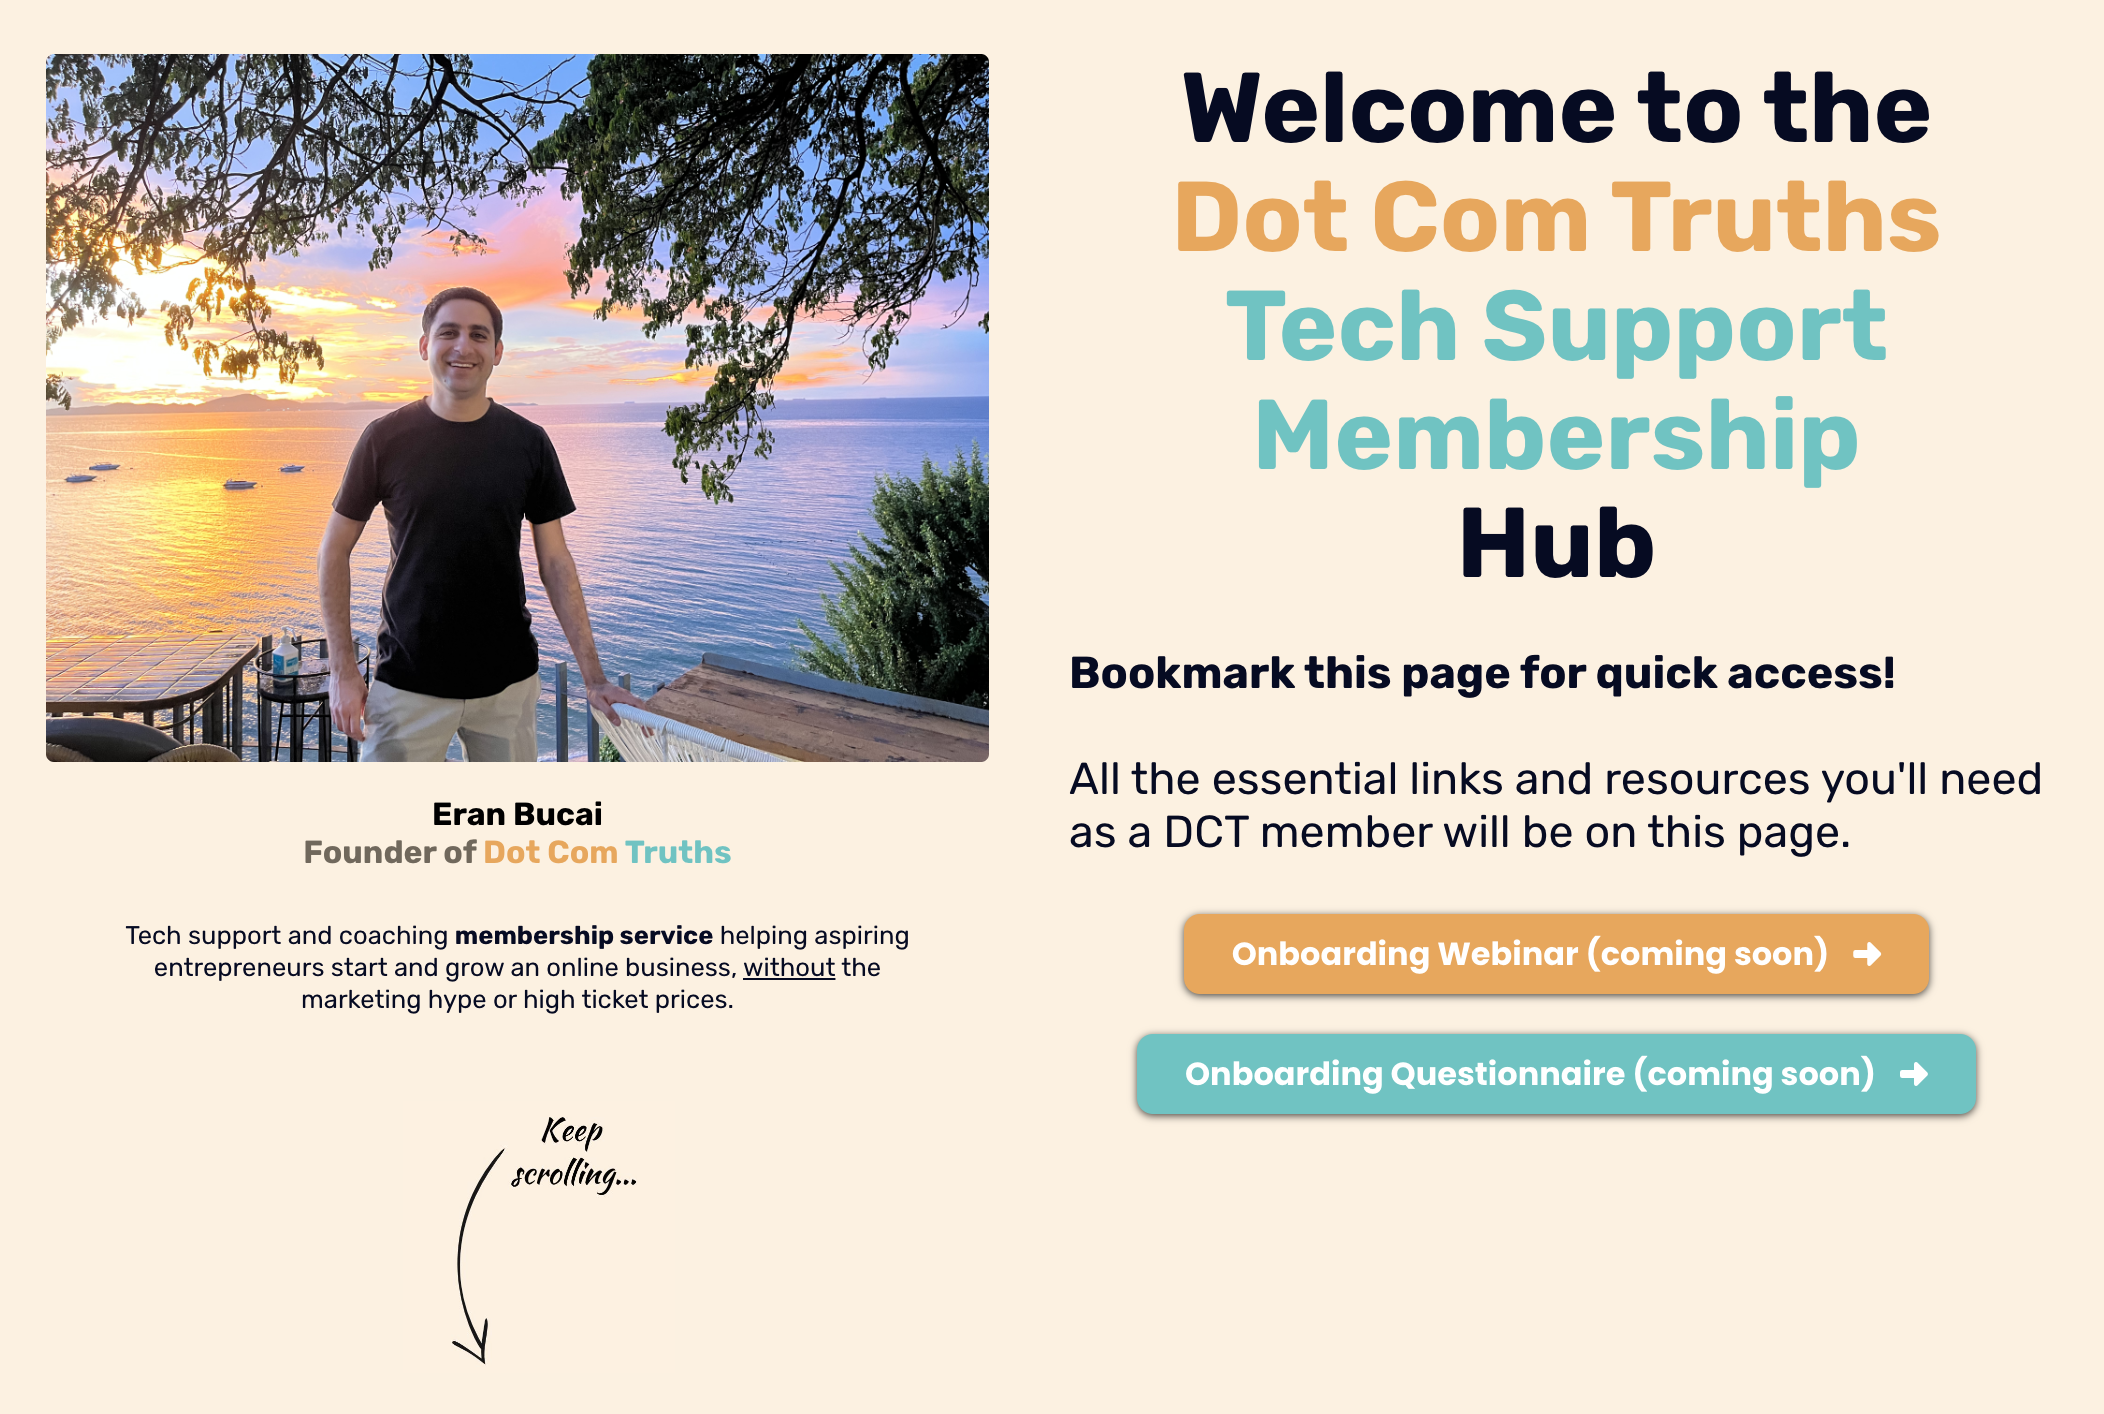
Section 1 - the header. This is your most important section as chances are, most people won't scroll past this... so make a very CLEAR headline, and an indication to scroll further... also, while I have an image on some of mine, I typically would prefer to have a video.
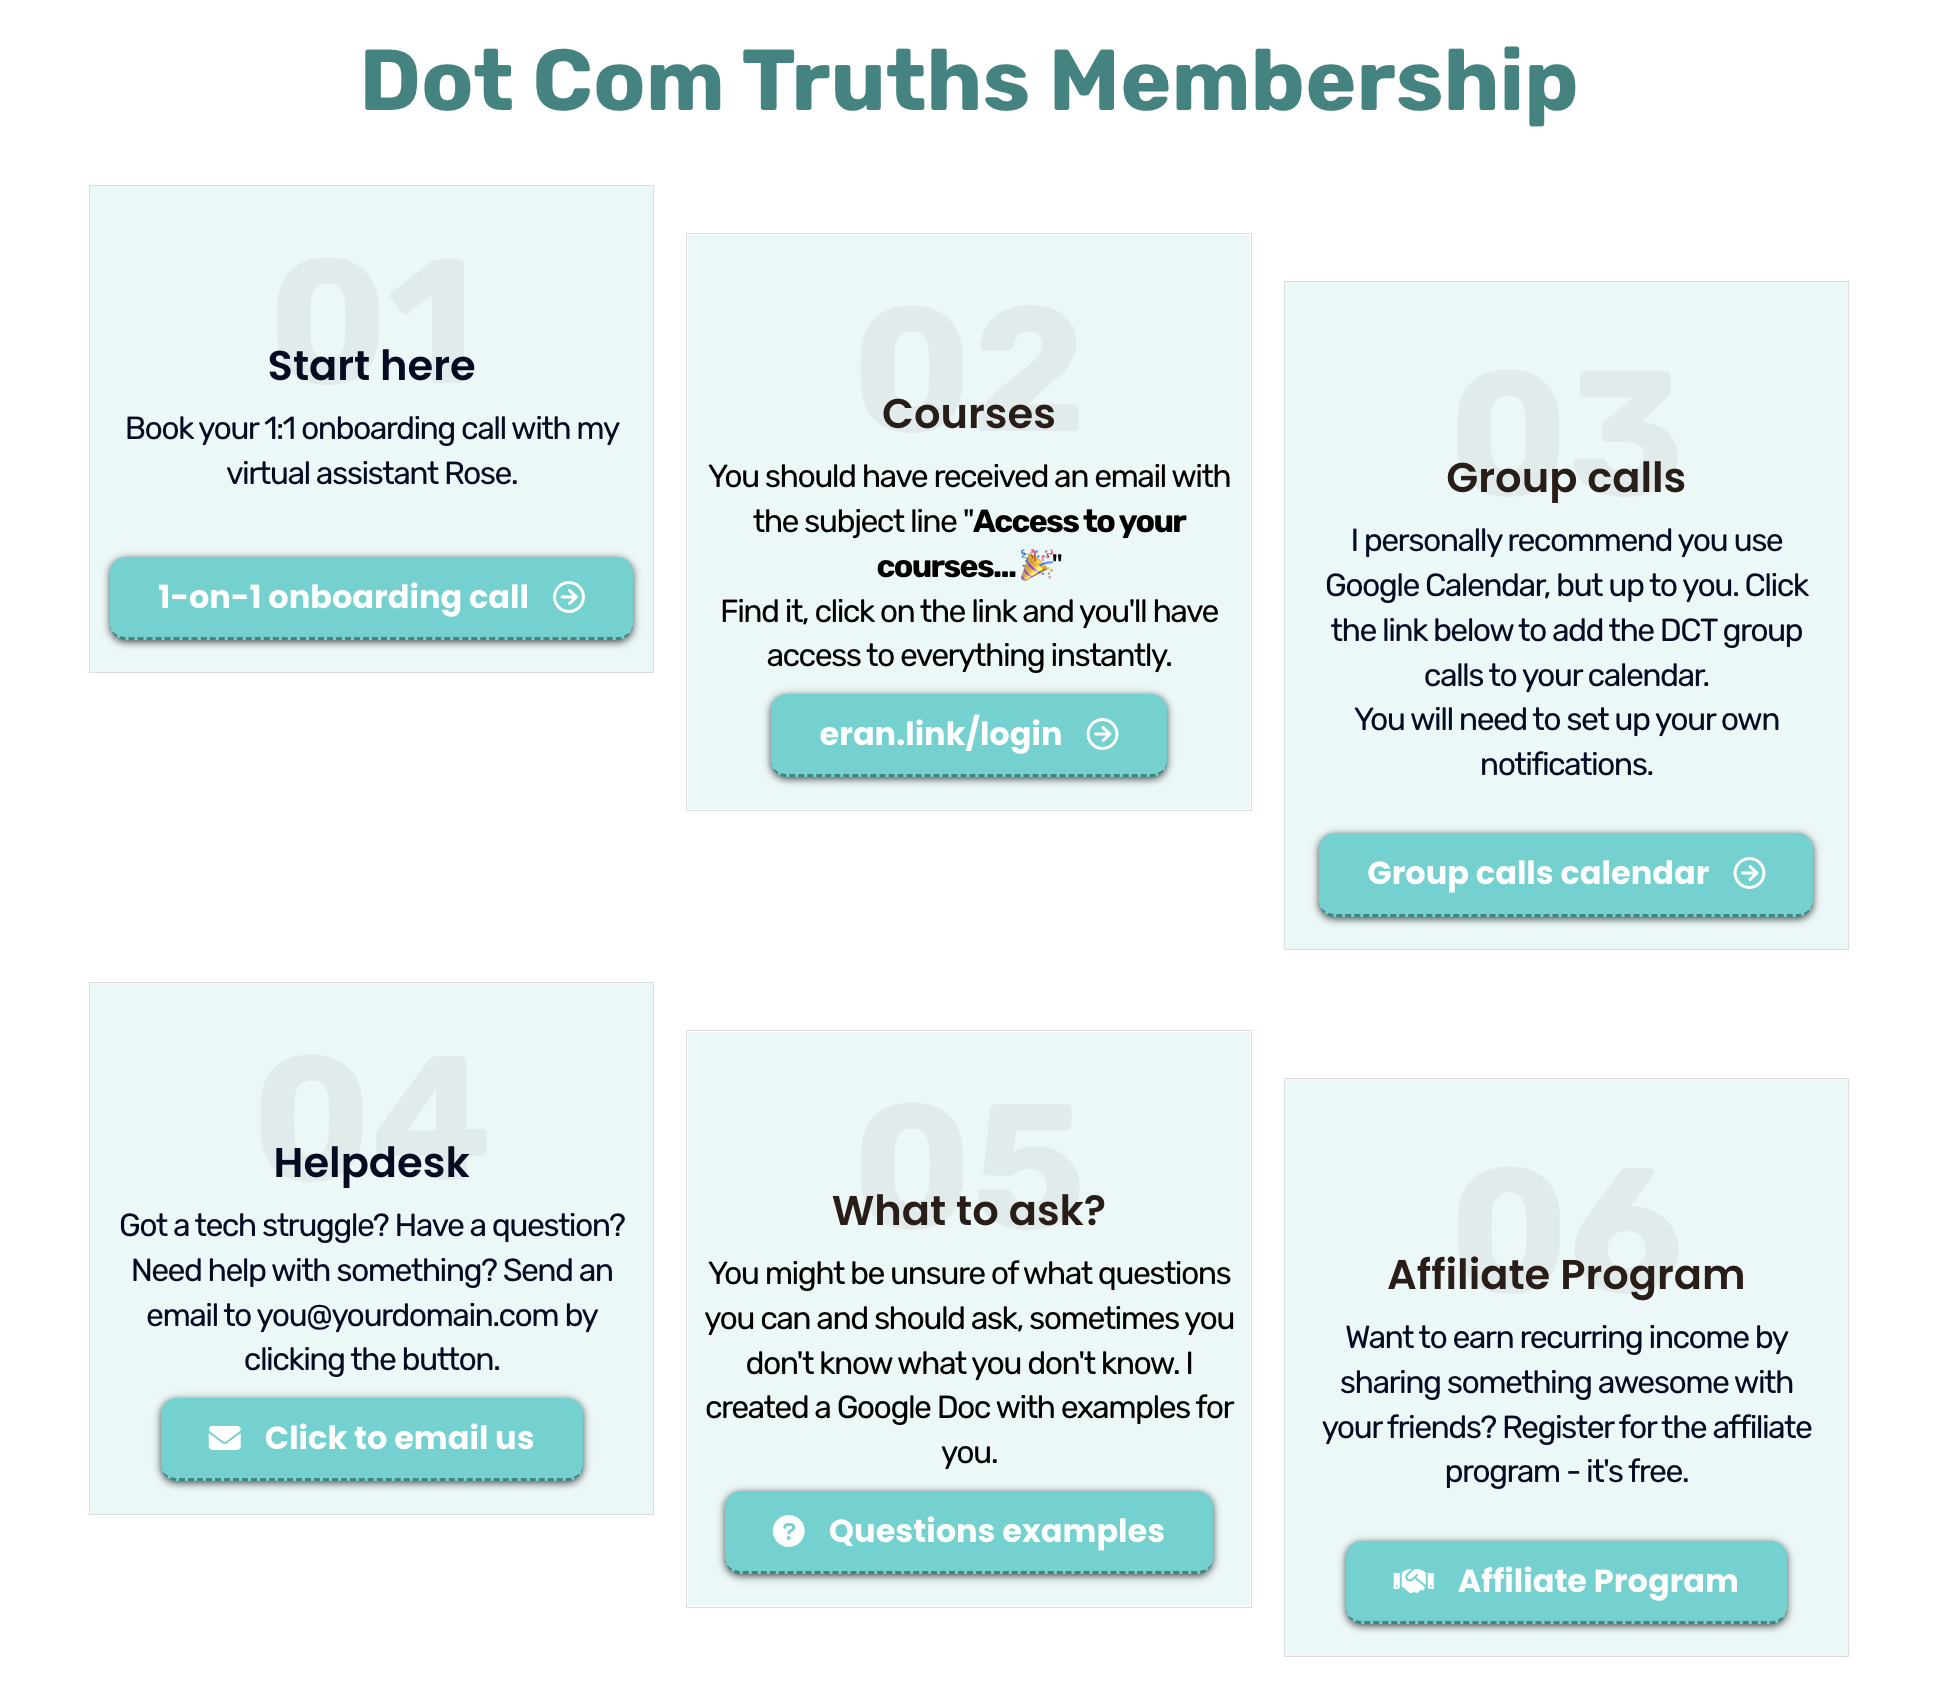
Section 2 - the squares/to-do's. The idea here is to give clear call-to-action for your new subscribers or members. Give them the specific tasks to do such a "save email as a contact", "download the workbook", "join the community", "share the masterclass", etc. Any action you want them to perform.
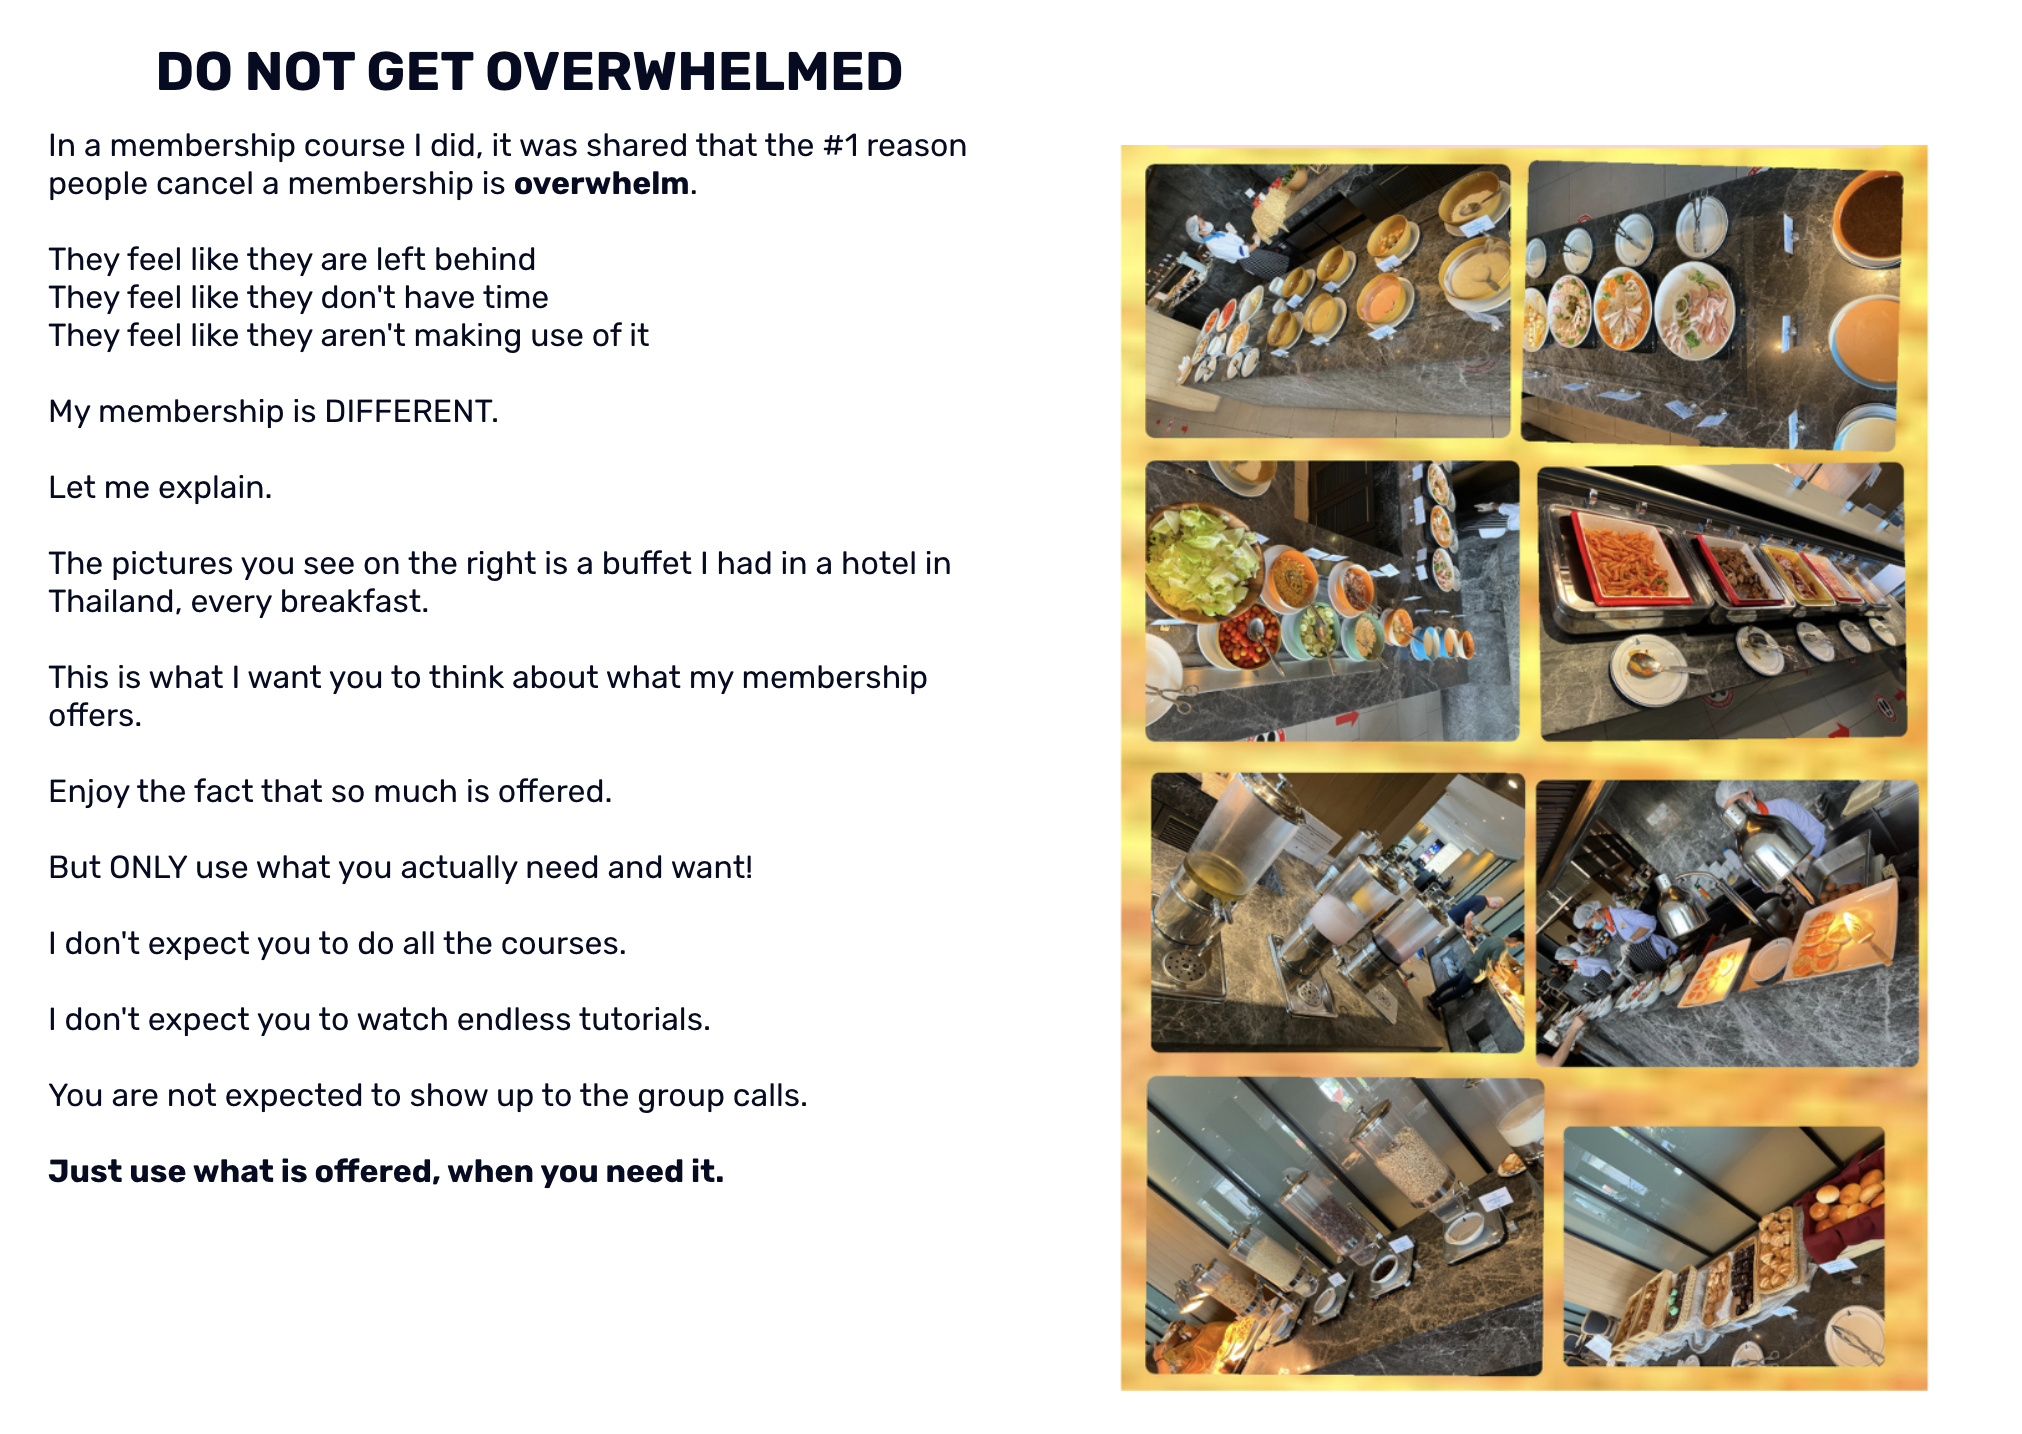
Section 3 - this is the core message, which I wanted to do to eliminate overwhelm. When I give lots of CTAs in section 2, that's fine and all - but people are easily overwhelmed. So I want to eliminate that and I use a unique analogy (a buffet) in my membership to share that message. Come up with your own :-) (or steal mine)
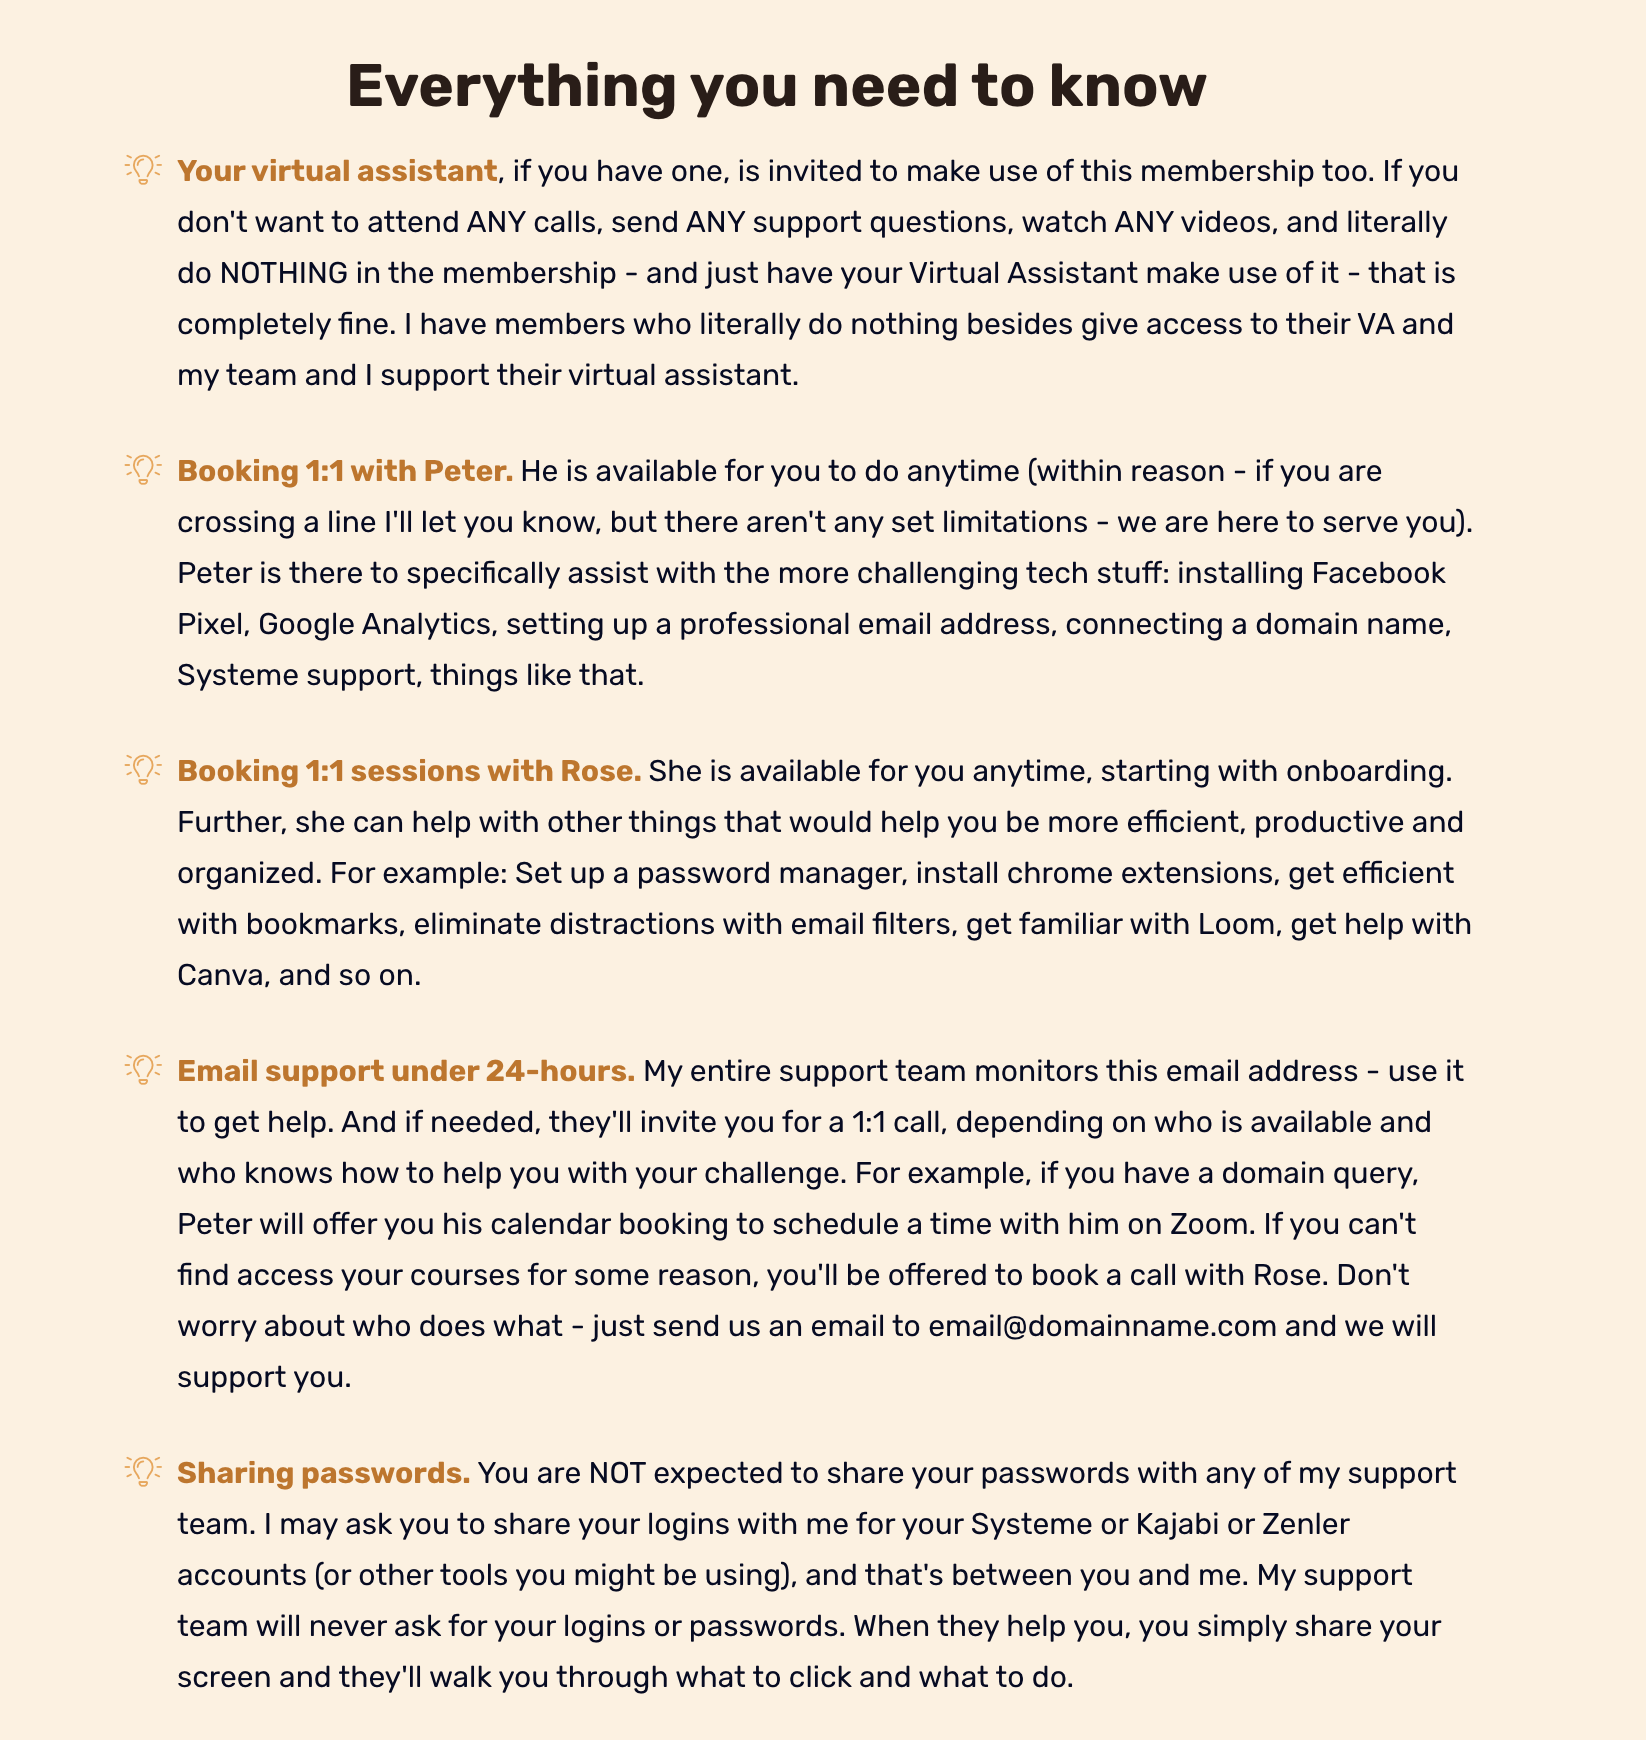
Section 4 - the bullets recap. Everyone likes a bullet recap. You read this far (or you scroll all the way without reading anything else...), it's a good way to remind or summarize the important points. Totally optional - since my tech support membership have a lot of stuff, I wanted to make sure I do a recap.
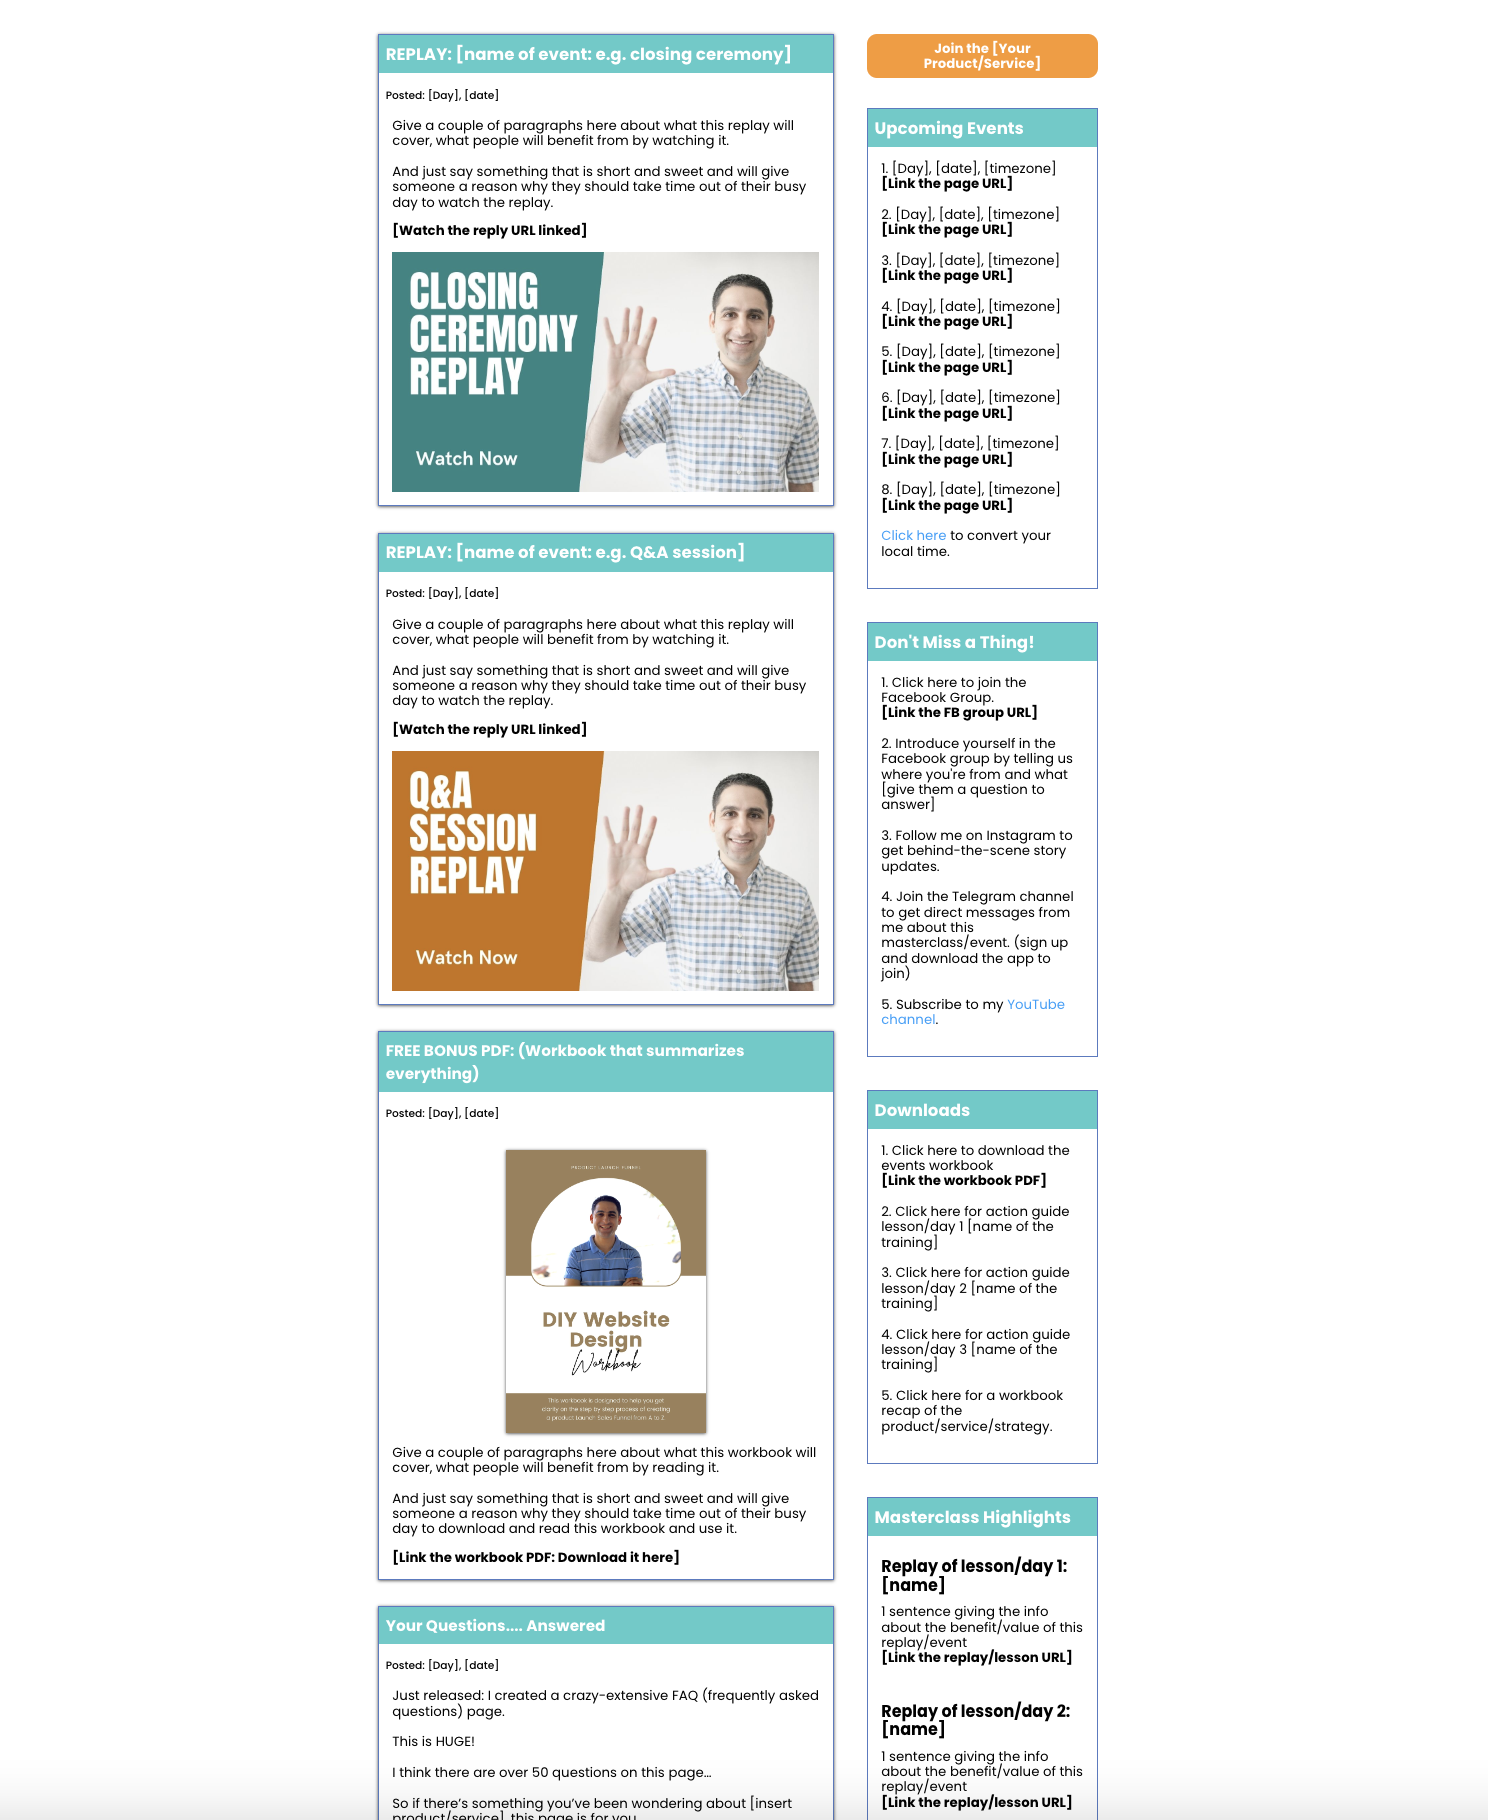
Jeff Walker Product Launch Formula concierge page replicate - this is simply an image of me modelling the look and feel of Jeff Walker's concierge page with my brand colours. This requires editing but will give you a great start to customize it for your own.
Membership hub section 1 (the header)
Membership hub section 2
(the squares/to-do's)
Membership hub section 3 (core message)
Membership hub section 4 (bullets recap)
Concierge Page based on Jeff Walker's PLF
Video Chapters
0:00 - Welcome
1:06 - Where I got the inspiration for the single page membership page
3:01 - How I applied the "single page" concept
5:36 - Creating the single page hub on Systeme.io
8:17 - How to create a pop up / redirect form for your users
10:58 - Why should I add a pop up to my single page hub?
11:45 - How to customize the elements of your single page hub
18:23 - Final thoughts
18:55 - Where can I sign up for Systeme.io?
20:00 - Closing
Video Transcript
00:00 Hey, hey, it's Eran here. In this tutorial I'm gonna share with you how to build a thank you page on your systeme.io website.
00:08 Now, this particular thank you page is modeling based on something that I've seen Amy Porterfield do and also Jeff Walker do.
00:16 And this particular thank you pages are a little bit more extensive. And what I mean by that is they're really designed more for when you're doing a product launch where it's over a week or every two weeks, or if you're launching a membership or you're doing something along these lines that's a little bit more than just a standard simple thank you page.
00:35 Like, thanks for joining me on my email list. Go check your email. It's a little bit more involved. It's got a little bit more resources.
00:42 You want 'em to do this, you want 'em to do that. There's a whole bunch of other stuff that might be involved and I took the inspiration of those particular pages that they do and kind of made it my own and tweaked it in a way that kind of makes sense to me, depending on the use case.
00:55 I want to share with you how to do that. And also, if you are part of my templates and coaching membership, you will have in the members area access to the specific templates.
01:06 So you can actually click and import the exact pages I'm about to show you. So first of all, lemme show you the inspiration.
01:12 So this is a page from Jeff Walker. Now this is a screenshot that I took from Jeff Walker from his product launch formula.
01:19 This is a multimillion dollar launch that he does every year. And you can see he basically does an event over a week or so.
01:27 And you can see the upcoming events each day of the masterclass. You can see this section which says, don't miss a thing and you, you can actually click on follow his Instagram clicker to join the Facebook group.
01:38 Little things like that, some videos to kind of explain how to make the most out of it and things along these lines.
01:44 And this kind of cons, he calls it concierge page. The concierge page kind of grows as as time goes on as part of the launch.
01:52 And then it's not visible anymore. That's why I have to show you a screenshot cuz I can't actually show you the actual page because they get taken offline.
01:59 Now if you like this particular page, you can see and I recreated kind of the look and feel on systeme.io and you can kind of see how this looks like.
02:08 And of course everything can be tweaked. You can change all the colors, you can change the background color, you can do all these things as you see fit.
02:15 So it's not like you're locked into how this looks, but it's kind of similar to what he has basically. So this is one template that I can share with you if you're interested.
02:25 I will definitely include the links for that if you are in the membership. This is the other inspiration that I wanted to show you.
02:33 So here's an example of a thank you page, which she did for one of her masterclass. And you could see there's a little gif from her, which, which is fine.
02:40 You can have her do a video or picture, whatever. And you could see here you're officially registered for how to have a recession proof, blah, blah, blah.
02:46 A little bit of text, scroll down to learn more. Here are your next step one, mark your calendar. Two set up, set up notification to your phone.
02:53 Answer the quick question. There's a little quiz, quick recap or recipe ingredients, a little funny copy, whatever. You know, it's all good.
03:00 Connect with me on social. Okay, that's all good. So this is kind of the example of this is a preparation for a masterclass.
03:06 This is like a, a product launch that she does. And this is the thank you page. So this is kind of the pages for inspiration that I kind of took and I'll show you what I've created in my business.
03:15 So you can kind of see what we're about to model. So if you look here, this is my virtual summit hub.
03:22 So basically this is like the one page where somebody, it's like the one pager thank you page where people are going to be able to always bookmark and refer back to when the summit is being hosted.
03:35 This was like the stable place, the stable, the one link they have to bookmark because it's gonna have everything there.
03:42 So there's a video that explains everything. There's a little welcome. I say the first thing is bookmark this page. And then I also mentioned PS you could still join the V I P or whatever.
03:53 And then I have two links here that takes them to a sales page. This will not work anymore because this summit is already over.
03:58 But you get the idea, it's basically gonna take you through a little bit of thing. And then you can see I've got this little, little keep scrolling and it says here the virtual summit agenda.
04:08 And then I have it this way. I just like to do like a little <laugh>, you know live session replay coming up.
04:14 So you can see here, session agenda, reach, replace, live session. None of this will work, but you get the idea.
04:20 Then here's, there's a screenshot of all the speakers over the few days. And this is just an image basically. And you can see here summary of the speakers, the implementation sessions and so on.
04:31 Now I've modeled the same type of page for my tech support membership. Now you'll see right here that basically I have the same thing.
04:40 Now here I just have a picture. I probably will change it. I'll probably do a video, but for now I have a picture.
04:44 You could see here I've got the little headline bookmark this page, all essential links and resources are gonna be here.
04:51 So basically in my tech support membership, I tell people, okay, this is the link to bookmark and every tech support email, every email I send out to my members includes this links so they can refer back to it.
05:02 Okay? So, and you can see here, start here. Book your one-on-one session, the courses log in, the group calls the help desk.
05:10 What to ask Affiliate program, join the community success path, share a link, a win. Then I've got here, don't get overwhelmed, I explained a little bit about how to make the most of the membership.
05:19 A little sketch of the roadmap as well. Jays, if you can make sure that you actually block out this section and also this section so people can't see this link and this link if you can make sure in when you're editing this, it's not visible.
05:37 And then here, there's a little recap basically somewhere of everything they need to know as well. So this is what the, the membership hub looks like.
05:44 So whenever I'm talking to a member, they're like, oh, I'm not sure what to do, whatever, go back to the hub.
05:48 Now if I'm hosting a webinar or a challenge or something along these lines, I will do the exact same thing.
05:54 And now I'm in the process of preparing a page like that for a couple of my funnels. One of them being my landing page challenge, which you're not familiar with that you can go to landing page challenge.com or if you're watching this video on YouTube, you can actually go to my landing page challenge.
06:08 Playlist. I have a whole bunch of videos there, but show you what the challenge is all about. I basically build people's landing pages live on YouTube.
06:15 Okay? So literally I will literally hop on a one-on-one call and build people's landing page live. Okay? So I'm gonna show you me sending up this particular page now.
06:25 So the first thing you wanna do is when you are picking the right page, in case you're not in my templates membership, I'll show you how to do it for free.
06:31 So basically you're going to choose opt-in thank you page. That's the one you want to use, i e once they opt in and enter their name and email, this is the thank you page that you're going to use.
06:43 Now in case this is a members area where somebody pays to get access to what it is that you're sharing, you will not use the opt-in, thank you.
06:54 You will choose a different one, which is when you click on add step, you can scroll down right here on the type.
07:01 So if it's a hub, which is based on a free webinar or a free you know product launch or something along these lines, you would use opt-in, thank you.
07:12 But if it's after a payment, you would use thank you page under sales. So this is the one you would choose.
07:18 Okay? Now in the case of what I'm doing, which is the landing page challenge, cuz the landing page challenge is free to join, I use Optin thank you page.
07:25 So now I'm gonna show you the editor area and I'm gonna share with you the link so you can see I'm using the same model.
07:31 I will probably replace this with a video, but now that's what I have and I'm in the middle of editing it.
07:36 So I basically took the ch the page that I had from my summit and my membership and I added different things here.
07:41 So for example, I said connect with me on Instagram, subscribe me on YouTube because those are the two areas I wanna build my audience on those platforms basically.
07:49 So that's kind of my goal. Now you'll see here that I have the do-it-yourself templates. I will basically have a course, it's gonna take you to it's gonna take you to basically do it yourself course and templates.
08:02 And this one will take you to add down four you option basically. So this is like my upsells basically. So this page is gonna be free for people when they join, but this will be the upsells.
08:11 Now I'm gonna say keep scrolling, landing page challenge links. Now this one is not fully done, but you can see I get up set up, start here.
08:19 And the welcome video opens up to YouTube, opens in a new window, which is very important. You wanna have it open in a new window because you wanted to not override the current page you are in.
08:30 So what I mean by that is if it says open in the same window, it's going to replace the page you're on, which I don't want that because this is the hub.
08:38 I want the hub to remain open. Okay? So that's very important that you clarify how you want that link to be.
08:44 Okay? Same thing if I want these clickable links, I want it to also open to a new window, not the same window.
08:52 So that's very important. Now you'll see here this is the checklist. So this is the landing page checklist. This one is Google doc, which is basically the things they need to fill out to follow the steps.
09:04 This is binge past sessions. So this is the playlist I told you about for landing page challenge, what to ask, this is an old, this is actually something I need to replace with something else.
09:12 Affiliate program I need to replace with something else, community and so on and so forth. Now there's different things you can do with these buttons.
09:18 These buttons don't have to open to a different page. It can also be something clever. So for example, I'm gonna show you something that you can do.
09:30 So I can do something here instead of success path, I'm going to call this share the love, okay? Now what I'm gonna do is on this button, what I'm gonna do is I'm going to say something else.
09:45 Instead of open your url, I'm going to say show popup and I'm going to select a popup. Now the popup is going to be basically getting people to you know, share the love, share the landing page challenge with friends.
10:00 Let's just say right now what I'm gonna do is I'm going to basically add links right here where it's going to be open your url and this u URL is going to open in a new window and this U URL is going to say basically share the love, like share it on Facebook for example.
10:19 Lemme just show you how to do that in a second. Lemme show you what it looks like. So basically I'm going to click on this button and I'm going to say this URL right here.
10:29 Now I'm gonna delete this form basically and I'm going to take change the text right here and say share this on Facebook.
10:40 Let's just say, okay, now I'm going to delete this subtext. You can say I deleted the subtext, I'm going to delete this and I'm gonna say this challenge is a hundred percent free.
10:58 All I ask is that you share this with your friends so they can also get the value for free. Okay?
11:10 Something like that. Now I can do for example, another thing which is share the thing on something else, right? But I'll just do the Facebook one for the sake of demonstration.
11:21 Now you'll notice that now that this popup has been created, I'm going to make it so it doesn't pop up at all.
11:30 Only it will pop up when I actually have this button. So I'm going to go back here and on share the Love, I'm going to say show popup popup number one and I'm going to share, share the share the challenge, Click on save.
11:51 Now I'm gonna click here on this button, it's going to refresh this page. And now you'll see when I click on share the challenge, it will come with this popup, share the challenge and it'll share it automatically to Facebook basically.
12:08 Now how I did all of this requires a little bit of extra stuff. This is not the topic of this particular tutorial.
12:14 This is actually a tutorial that I created as part of the thank you page in a day course. If you wanna check out that course, it's gonna be linked in the description as well.
12:21 So that's something that's available for you to check out. But this is a really good hack to actually build your email list.
12:27 Okay, so now you'll notice that now I can't close it, so that's kind of annoying. So what you wanna do is you want to go back to the pop-ups and then you want to click here and then you want to in the pop-ups, you wanna click on edit settings and you want to basically show close button.
12:44 You wanna turn it on. So then there is a close button so people can actually close it, which is this thing right here.
12:49 Okay? So that's just something that you need to just be aware of, but you need to make sure. Now this is good also if let's say you're doing a membership hub and you want to keep people on your page, you don't want them to leave, then you can actually do your onboarding video for example on something like this.
13:06 So you can actually go here and actually drag and drop your onboarding video right here like this and put the video.
13:13 Now unfortunately with systeme. io, I can't customize this pop up, I can't make it wider or anything like that. So it's gonna end up being a small window, but that's something you're gonna have to just you know, decide if this is something that's not gonna work for you, you'd have it open in a new tab.
13:26 If it is gonna work for you, just have it right here. So that's totally fine. Whichever way kind of works for you and how you wanna set things up.
13:33 You just need to be aware of this particular limitation. Okay? Now this particular option with sending all this up and all these things you can obviously customize.
13:44 So for example, if you observe here the row hover on the not the row, but look, it's under content box.
13:51 You see here when I hover over the content box, you could see this is the background color. So I can change this background color to something else.
13:59 Let's see your brand color is this particular green. Then you can change that and make that a little bit different or yellow or what whatever that kind of looks like for you.\
14:08 Okay? I'll obviously kind of change it back to what it was, but I'm just saying you can actually tweak it as you see fit.
14:16 Now also you can also do is if you want to make this section white and make this background white, then what you can do is you can click on the section, make this background color something else.
14:28 So for example, in my case I have a different color. Lemme just show you the orange one. I have all my branding colors on brand dot around bka.com and stuff like that.
14:39 So if you wanna see what I have you can click here on the primary background, which is what I use, and then paste the in and replace it and then do something like this.
14:47 And in the background of the content box, not the row notice it's the content box. I will change that now to, for example, this primary color as an example or, and then make this text white or just make this white.
15:02 That's another option. Again, you can see it just gives it a tif, totally different look and feel. Now on the content box as an example, I can also choose, so hover closely and you see content box, I'm gonna click on it.
15:14 I can also do something. You can see here the color of the background is this gray. So I can click on the color and make the background this little orange thing.
15:23 So you can see the, it's kind of, it just gives the page a totally new and different vibe. Okay? Now on the content box as well, what you can also do is you can actually see the rounded section.
15:36 So you can see the rounded corners. You can see here it's square. You can actually tweak it to make it 10, 10, 10 and 10.
15:42 And you can see how it rounded off the corners as well. Again, it just gives it a totally different look and feel for how you want it.
15:50 So in my case, I might decide, you know, I want mine stuff to look a little bit different for the landing page challenge just because I, I feel like it, you know what I mean?
15:57 So I might do something like this and you could see, just gonna give it a different vibe. Okay? So anyway, that's something I can always, I'm always exploring, always testing, you know, I'm, I'm pretty flexible and all that stuff, but something to consider.
16:10 And then I can see here, I'll do the background for this section. Make this section white. Now this keeps scrolling.
16:16 I actually did it. So the image has this background. Okay, so this is important. I will need to now replace this image, which is gonna be just annoying.
16:25 So I'm not gonna really bother with that. I'll just go back to what it was and I'll just keep it this way, okay?
16:30 But this is a cool little way to kind of tweak it, make it a little bit different and stuff like that.
16:35 So anyway, that's just something Fiji can always explore and so on. Now in terms of tweaking everything, anything else here I wanted to show you.
16:42 So you could see here the bullets that you can tweak. You can click on the bullets and the way you would start it basically is you would simply drag and drop the bullets.
16:53 Lemme just go back, you'll just drag and drop the bullets right here, okay? And then here on the bullets, you will basically tweak things.
17:02 Now I'm gonna show you how I tweak my stuff so you can kind of see how I did it. First of all you always wanna click on the bullet list and when you click on this bullet list, you need to just pay attention.
17:12 But always here on the left this pops up. Now the most, the thing that I like to use, first of all, you wanna choose the icon selector because the icon selector always makes a difference on the look and feel.
17:22 So you right now have like an idea thing. Now I can actually change that. So instead of an ID thing, I can put something like a check mark like this.
17:30 Okay, I can also do something like this, okay? And if it doesn't work right away, just click on it again basically.
17:38 You can also scroll down and see there's many, many, many, many different options. So you can just pick the one that you're comfortable with and really like, you know, just pick one really, cuz there's literally so many options, but you can actually scroll down and can get a feel for everything that is available.
17:55 So there's lots of stuff that he can look at. So if I'm doing something like, okay, follow me on YouTube or something like that, I'll show you how to do that.
18:01 I can do like a bookmark thing for example. That's also another good one. In this case I'm just gonna leave it as light bulb just for the sake of demonstration, but also it's good for me to play with.
18:11 Now the vertical spacing is very important because that's what does the spacing between the bullets. So notice if I put the vertical spacing at zero, you see it looks really, really squashed.
18:22 Once I make it 30, you can see it gives the spacing in between here. Now the line height, what it does is it spaces out the text in between here.
18:31 So if I make this line height, I usually recommend that the line height is between five and 20 of the font size.
18:39 So if the font size is 20, make this either 25, not 45, sorry, <laugh> make this, oops, 25 or up to 40.
19:00 So you see a 41 40 is 45 is too much. This is probably the most you can do in terms of spacing to make it look kind of decent
.
19:07 So I did I think 30 on this one you can do 35. Yeah, just makes it a little bit more readable.
19:13 Okay, so let's say 32, you can see it's a little bit more readable. Now if I do it, let's just say I'm gonna do it now and I'm gonna do it the same as the font.
19:27 You could see it's like really squashed, okay? That's why it's actually quite important to make it so it's, you know, a little bit more basically.
19:35 Okay, the icon size, again, if you want the icon to be really big, like you can actually do something like this, for example, make it 60 and you can see it's gonna be way bigger.
19:43 Again, I don't like it this way, but I'm just saying depending on how you wanna customize things, you can do it this way.
19:48 Usually I do the icon the same size as the font. You can also do it a little bit bigger as well if you want to.
19:53 So it's a little bit more visible. That's another option, okay? If you wanna make this text a little bit bigger, the way I did this, notice that this text basically what I did is I just highlighted this section alone and then I customize the text color right here.
20:08 Okay? So if I wanna change it to red, it will just change this portion. Whereas if I was to click on the text here in general and change the text color for example to yellow it will probably change everything to yellow.
20:23 So I'll do like this and it's just gonna look awful, but you get the idea <laugh>, I'm not gonna do that.
20:29 I'm gonna go back. But you get the idea. That's how you customize the colors. Let me just move it back.
20:36 It's not ugly. Okay? So these are the different elements that I want to show you. These sections, these blocks as well as these bullets.
20:47 Now these buttons, these are just buttons and I'll show you how to do this one where it says the Instagram, this is basically bullets and bullets and what I did is I just made one bullet and when I click on this section right here, I just chose YouTube basically.
21:01 And then I chose the icon color being red cuz it's YouTube color. And the Instagram I just did discolor because Instagram has like different colors, so I just did it in blue, it just looks better that way.
21:11 So this is how I did it. And again, the text here, I just customize it by changing it this way and a little thing like that.
21:18 And then this is an image basically on the image again, I did a border radius, so you can see it's kind of rounded around here.
21:24 And yeah, again, that's just an image you can customize as you see fit, make it smaller, make it bigger, stuff like that.
21:31 Okay. Yeah. Cool. I think that's pretty much everything I wanted to cover. So this is how you would set up the hub page or the thank you page for your membership, whether it's free or paid, depending on which one you choose, what the sequence is and so on and so forth.
21:45 If you wanna learn more about my membership, whether it's the coaching and templates membership or my tech support membership or any of the reasons I've spoken about here, all everything is gonna be linked in the description for you to check out.
21:57 Otherwise if you need this channel, please do subscribe and lemme know what other videos or tools you'd like me to record.
22:02 I'll be happy to put on my list to be able to record these and share more value for you for free.
22:07 Thanks all for watching and speak you soon.
Inspiration
As I mentioned in the video, the inspiration for these pages came specifically from seeing Jeff Walker's Product Launch Formula (concierge page) and further, from Amy Porterfield Masterclass / Challenge thank you page.

Hey, I'm Eran
I'm the CEO & Founder of Eran Templates (duh), since these are my templates 😉
I've worked for years to create digital assets in my business from email content, Canva slides and posts, website pages, and more.
Now is the time that I share all these creations with as many people as possible to give them a shortcut to getting things done with less time and less effort (without a hefty price tag).
This page was created for paid members only at this stage.
Please do not share it.
You are always welcome to join the affiliate program and help spread the word.
Visit: eran.link/jv